hello guys,
found one good article on SharePoint Object Model for Performance Tuning best practices.
http://blogs.msdn.com/b/sowmyancs/archive/2008/10/26/best-practices-sharepoint-object-model-for-performance-tuning.aspx
Feb 15, 2012
Feb 7, 2012
Seqential workflow in SharePoint 2010 using Visual studio 2010
Hello guys,
In this article we will work on developing sequential workflow in SharePoint 2010 using Visual studio 2010.
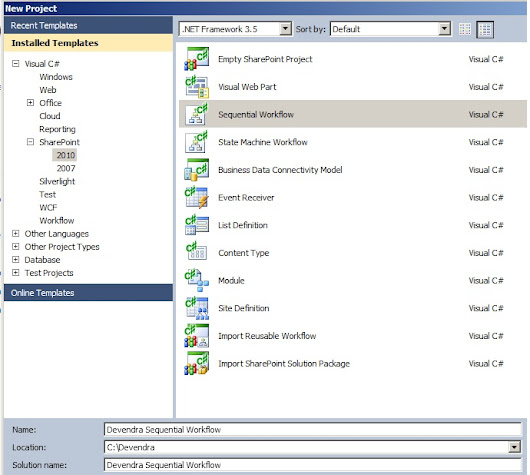
let start creating new project of type Sequential Workflow ,under SharePoint 2010 in Visual studio 2010.
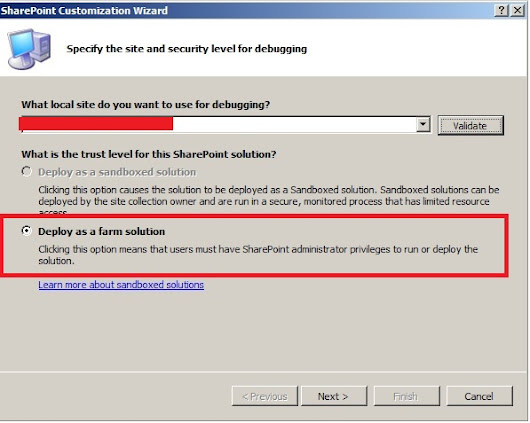
Deploy as form Solution. Click Next
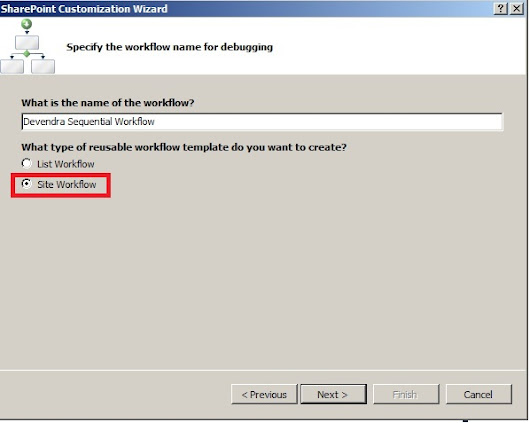
Name workflow as devendra Sequential workflow and select site workflow.
click on Next
CLick Next.
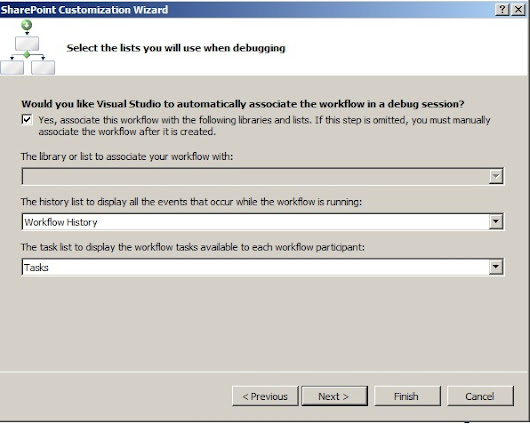
CLick Next.
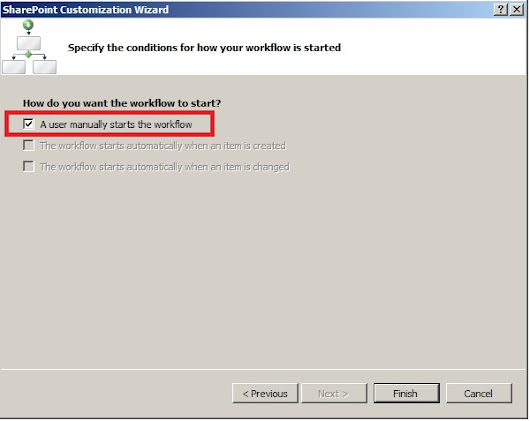
Click on Finish.
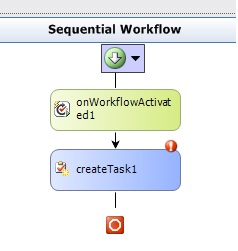
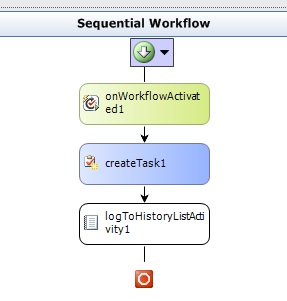
It will show the below project structure.

Go to tool box. Select Create Task under SharePoint workflow

Drag and drop below onworkflowActivated .
Click on the redmark in Createtask1 control
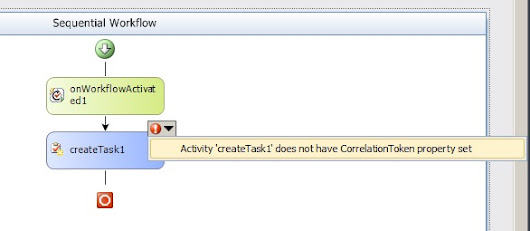
Click on Activity ‘createTask1’ does not have Correlation property set.
Give the Correlation token as Task token.
Select Owner ActivityName as Workflow1.
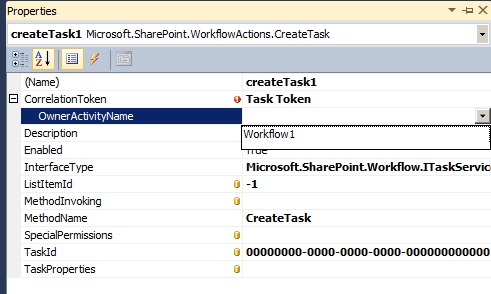
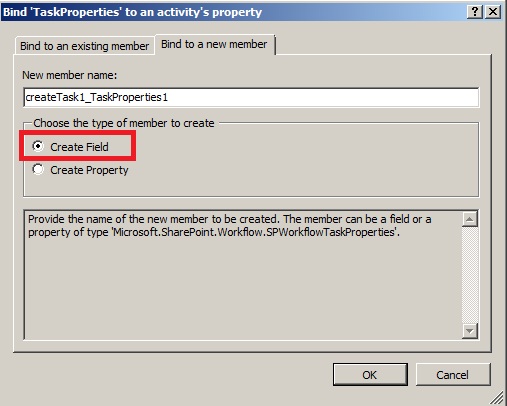
Click on TaskProperties.Select Bind to new member.
Select create Field. Click OK.
Go to workflow.cs[design] --> right click --> View Code
It will redirect to the code file workflow.cs file you can see the filed you have added just now.
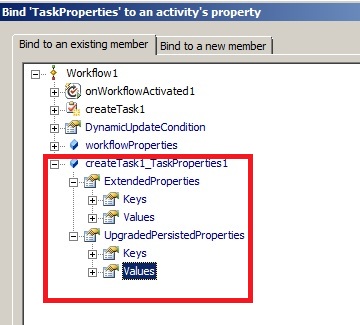
If you check the Bind to existing member you can the Field added it.
Click on TaskID from the properties of CreateTask activity. Select Bind to new member.
Select create Field. Click Ok.
Go to workflow.cs[desgin]-->right click -->View Code
It will redirect to the code file workflow.cs file you can see the filed you have added just now.
Go to Workflow1.cs-Desgin.
Double click on Create Task Activity.It will generate a method called createTask1_MethodInvoking.
Write the below code in the method.
The above code create the task for user we runs the workflow.
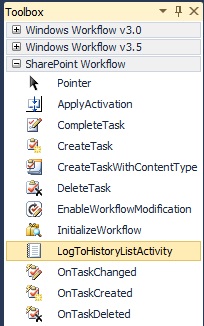
Go to ToolBox select LogtoHistoryListActivity under Sharepoint workflow
Drag and drop the LogtoHistoryListActivity to workflow.cs[design] file below create task
Click on logToHistoryActivity1 Press F4 to see the properties.
Click on History Description.

Click OK.
Check the properties logToHistoryActivity1

Right click on logToHistoryActivity1.
Click on Generate Handlers.

A method will get generate with the name logToHistoryListActivity1_MethodInvoking
Paste the below code inside the method.
Select the project. Right click and Deploy.

Go to Site Actions->View AllsiteContent.

Select Site Workflows.

Click on Devendra Seqential workflow.

Click on status completed.
You can see the web site URL under Description.

You can check the task also has been created in task list for the user who has run the workflow.
Hope you find this useful.
SharePoint-Journey for Administrators, Developers and users
In this article we will work on developing sequential workflow in SharePoint 2010 using Visual studio 2010.
let start creating new project of type Sequential Workflow ,under SharePoint 2010 in Visual studio 2010.

Deploy as form Solution. Click Next

Name workflow as devendra Sequential workflow and select site workflow.
click on Next

CLick Next.

CLick Next.

Click on Finish.
It will show the below project structure.

Go to tool box. Select Create Task under SharePoint workflow

Drag and drop below onworkflowActivated .

Click on the redmark in Createtask1 control

Click on Activity ‘createTask1’ does not have Correlation property set.
Give the Correlation token as Task token.
Select Owner ActivityName as Workflow1.

Click on TaskProperties.Select Bind to new member.
Select create Field. Click OK.

Go to workflow.cs[design] --> right click --> View Code
It will redirect to the code file workflow.cs file you can see the filed you have added just now.
If you check the Bind to existing member you can the Field added it.

Click on TaskID from the properties of CreateTask activity. Select Bind to new member.
Select create Field. Click Ok.
Go to workflow.cs[desgin]-->right click -->View Code
It will redirect to the code file workflow.cs file you can see the filed you have added just now.
Go to Workflow1.cs-Desgin.
Double click on Create Task Activity.It will generate a method called createTask1_MethodInvoking.
Write the below code in the method.
       private void createTask1_MethodInvoking(object sender, EventArgs e)
  {
      createTask1_TaskId1 = Guid.NewGuid();

      createTask1_TaskProperties1.Title = "New Task";
      createTask1_TaskProperties1.Description = "Please complete this ASAP";
      createTask1_TaskProperties1.AssignedTo = workflowProperties.Originator;

  }
The above code create the task for user we runs the workflow.
Go to ToolBox select LogtoHistoryListActivity under Sharepoint workflow

Drag and drop the LogtoHistoryListActivity to workflow.cs[design] file below create task

Click on logToHistoryActivity1 Press F4 to see the properties.
Click on History Description.

Click OK.
Check the properties logToHistoryActivity1

Right click on logToHistoryActivity1.
Click on Generate Handlers.

A method will get generate with the name logToHistoryListActivity1_MethodInvoking
Paste the below code inside the method.
private void logToHistoryListActivity1_MethodInvoking(object sender, EventArgs e)
  {
  logToHistoryListActivity1_HistoryDescription1 = "Work Flow is Running on " + workflowProperties.Web.Url;
  }
Select the project. Right click and Deploy.

Go to Site Actions->View AllsiteContent.

Select Site Workflows.

Click on Devendra Seqential workflow.

Click on status completed.
You can see the web site URL under Description.

You can check the task also has been created in task list for the user who has run the workflow.
Hope you find this useful.
SharePoint-Journey for Administrators, Developers and users
Feb 6, 2012
Import Reusable Workflow using Visual Studio 2010
Hello Guys,
This Article we will work on Importing reusable Workflow using Visual studio 2010.
In the last article we worked on Reusable Workflow with Associate Columns.
Open Visual studio.
File-- >New -->Project.
Select SharePoint 2010 ,Import Reusable Workflow.
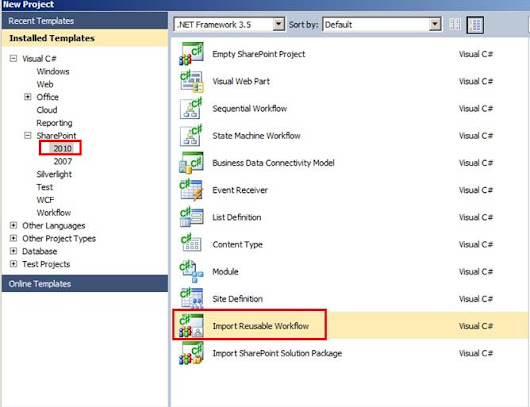
Deploy as Form solution.
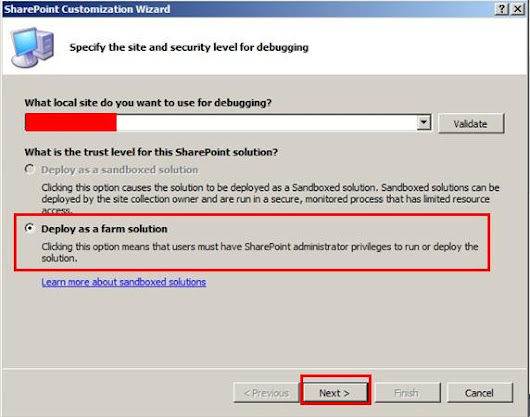
Click next.
Browse for the Employee Rating WSP which we copied from "SiteAssests" Library to local disk.

Click Next.
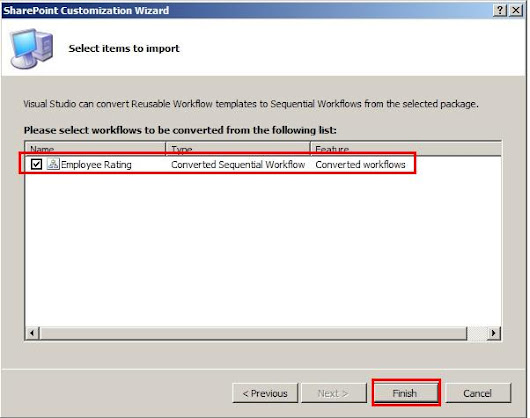
Select Employee Rating and Click Finish.
see the project structure Below.
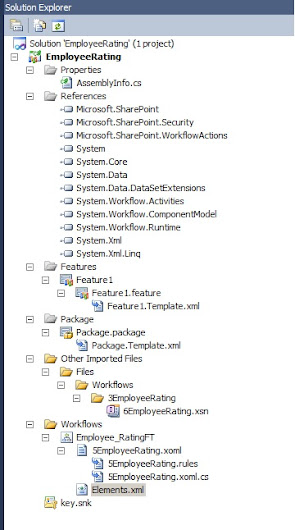
Click on feature 1 , scope will be default to site(Site Collection)
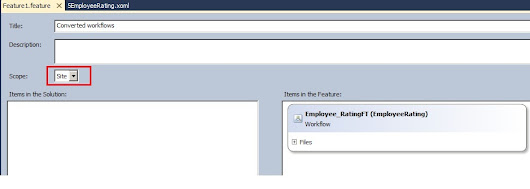
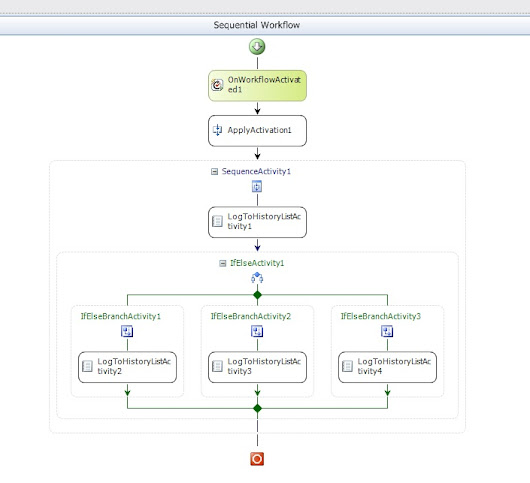
Check the workflow design , we can find the three conditions for Grade A,B and C
which we are logging into History List.
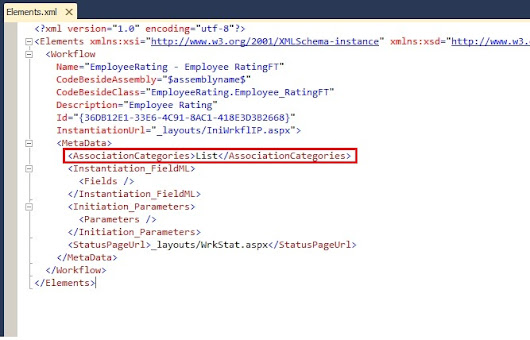
Open Elements.xml file where check the AssociationCategories which defined to List.
so in Visual studio 2010 there is new project template for Importing the Reusable workflow which we created using SharePoint designer.
Hope you find this is useful.
SharePoint-Journey for Administrators, Developers and users
This Article we will work on Importing reusable Workflow using Visual studio 2010.
In the last article we worked on Reusable Workflow with Associate Columns.
Open Visual studio.
File-- >New -->Project.
Select SharePoint 2010 ,Import Reusable Workflow.

Deploy as Form solution.

Click next.
Browse for the Employee Rating WSP which we copied from "SiteAssests" Library to local disk.

Click Next.

Select Employee Rating and Click Finish.
see the project structure Below.

Click on feature 1 , scope will be default to site(Site Collection)

Check the workflow design , we can find the three conditions for Grade A,B and C
which we are logging into History List.

Open Elements.xml file where check the AssociationCategories which defined to List.

so in Visual studio 2010 there is new project template for Importing the Reusable workflow which we created using SharePoint designer.
Hope you find this is useful.
SharePoint-Journey for Administrators, Developers and users
Feb 3, 2012
Reusable Workflow with Associate columns in SharePoint 2010 using SharePoint Designer 2010
In This Article we will work with Reusable workflow using SharePoint designer 2010.
Scenario is based on different employee rating selection we will log the rating details into History list.We are going to use associate column in this workflow.
Create Site Column:
Open SharePoint designer 2010. Open the site. Select site columns.
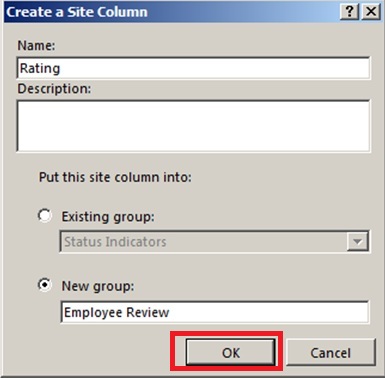
Create site column Rating of Type Choice.
Select new group as Employee Review.
Enter three values Grade A, Grade B, Grade C. Select Display as Drop-down menu
click OK.
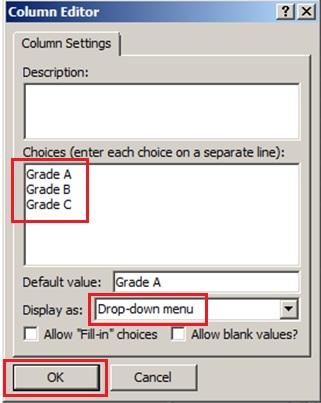
Click on OK and save the site column.
Create Content Type:
Content Type with the name Employee Rating.
Select Parent content Type as document content Type.
Select New group as Employee Review.

Click OK.
Click on the Employee rating Content Type.

Click on Edit Content Type Columns.
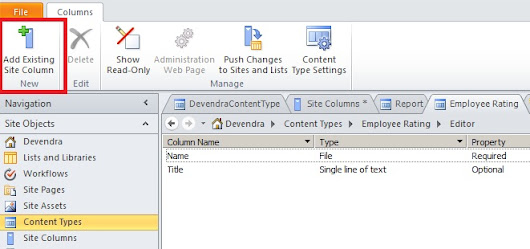
Search for Rating column, select the column and add it(Click OK).

Rating column added to the Employee Rating Content type.

Select the content types from the left navigation .and click on Employee Rating.
Click on Administration webpage, it will open the content type in browser.
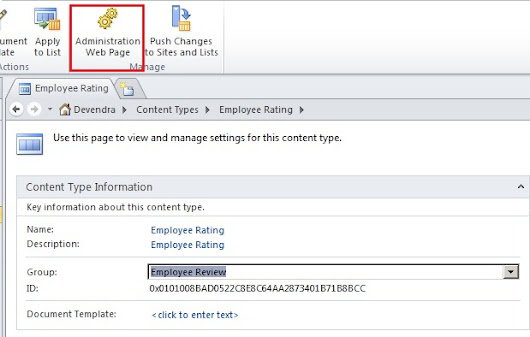

Click on Advanced settings.
Browse and upload the Employee Review document.

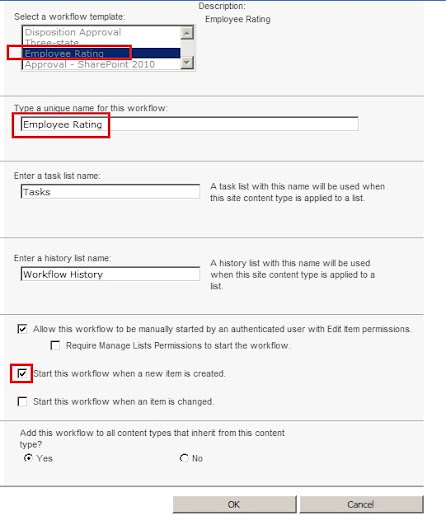
Create Reusable workflow:
Open SharePoint Designer.
Click on Workflows in left navigation bar, click on Reusable workflow.

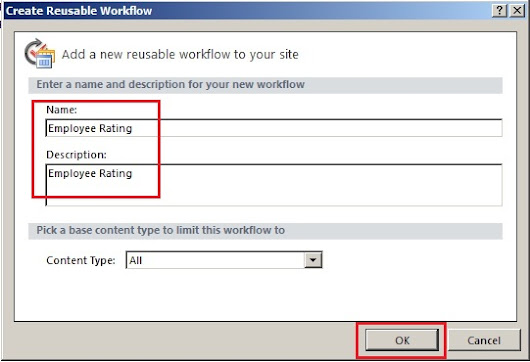
Enter Name and Description and Click OK.
Click on Association columns.
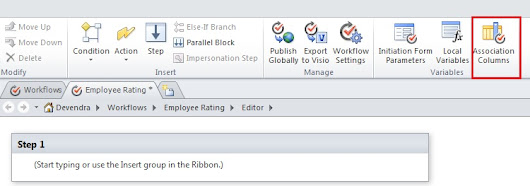
It will open the below pop up screen.
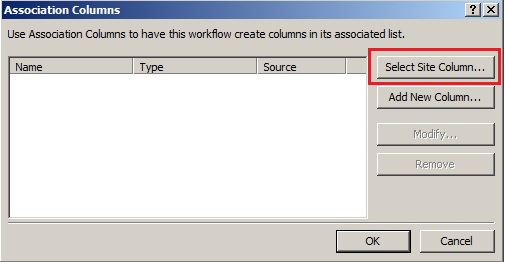
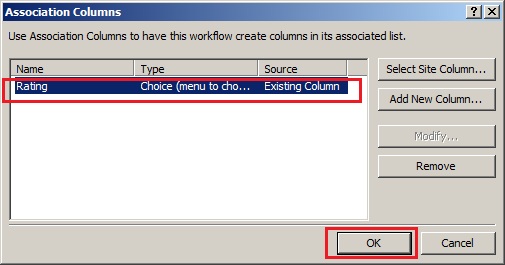
Click on Select site column; add the site column Rating you created before. Click OK.
In the Step1.
A)
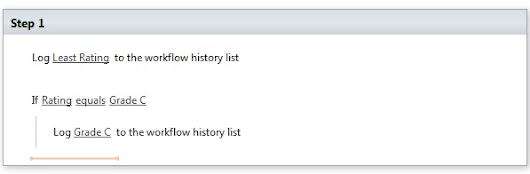
Create Log to history List action. Click on This message and Enter “Least Rating”

B)
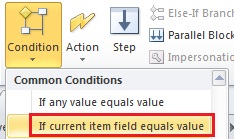
Add Condition “If Current item Field equals value”.
Select Field as “Rating” and Value to “Grade C”.
C)
Create Log to history List action. Click on This message and Enter “Grade C”. Refer (A)
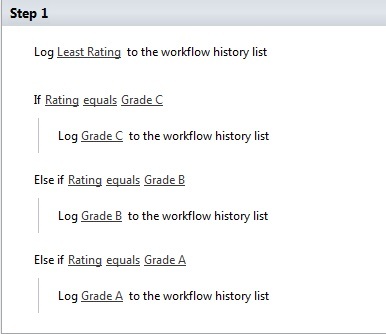
Once you complete this it will be like this.
Add two more conditions for Grade B and Grade A.
Perform (B) and (C) to achieve this.
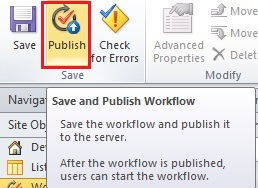
Click on publish.
Click on workflows from Left navigation Bar and click on Employee Rating Workflow.
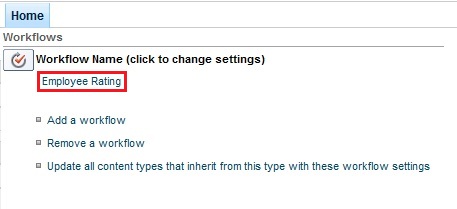
Click on Associate to Content Type and click on Employee Rating.

It will open the workflow in browser.
Check the “Start this workflow when a new item is created”. Click OK.
You can see Employee rating workflow has been created.
Now we will use content type we created in Shared documents library.
Select Lists and Libraries from Left Navigation Bar in SharePoint Designer and Select Shared documents.
Check the Allow management of Content Types under settings-- >advanced settings.
Then click on Add.


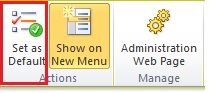
Select the Employee rating Content Type and click on set as default on the Ribbon.
Go to shared documents library and click on documents on the ribbon.
You can see the default document template is Employee rating.
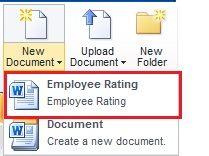
Click on Add New document upload any document.
Select the content Type as Employee rating .
Rating as Grade A.
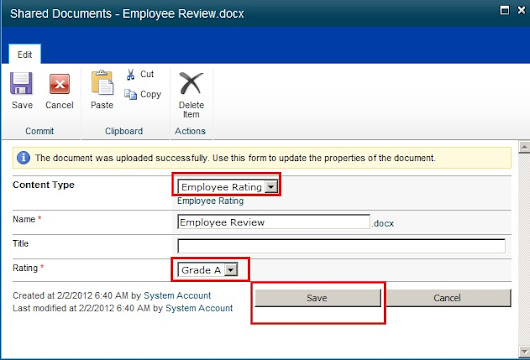
Click on Save.
Right click select workflows.
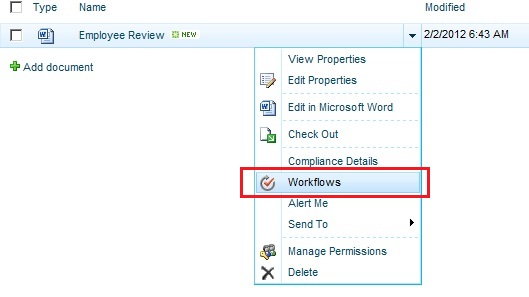
Click on Employee rating Workflow.
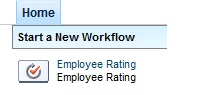
Click start button.
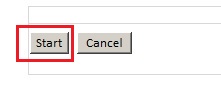

Click on Status Completed.
We select the Grade A, so the History description will come as Grade A.

So this way we can use the associate column data can be used.
If you select the Grade B or C , the History description will come as Grade B or C.
Let’s try…
Hope you find this useful.
Scenario is based on different employee rating selection we will log the rating details into History list.We are going to use associate column in this workflow.
Create Site Column:
Open SharePoint designer 2010. Open the site. Select site columns.
Create site column Rating of Type Choice.
Select new group as Employee Review.
Enter three values Grade A, Grade B, Grade C. Select Display as Drop-down menu

click OK.

Click on OK and save the site column.
Create Content Type:
Content Type with the name Employee Rating.
Select Parent content Type as document content Type.
Select New group as Employee Review.

Click OK.
Click on the Employee rating Content Type.

Click on Edit Content Type Columns.

Search for Rating column, select the column and add it(Click OK).

Rating column added to the Employee Rating Content type.

Select the content types from the left navigation .and click on Employee Rating.
Click on Administration webpage, it will open the content type in browser.


Click on Advanced settings.
Browse and upload the Employee Review document.

Create Reusable workflow:
Open SharePoint Designer.
Click on Workflows in left navigation bar, click on Reusable workflow.


Enter Name and Description and Click OK.
Click on Association columns.

It will open the below pop up screen.

Click on Select site column; add the site column Rating you created before. Click OK.

In the Step1.
A)
Create Log to history List action. Click on This message and Enter “Least Rating”

B)
Add Condition “If Current item Field equals value”.

Select Field as “Rating” and Value to “Grade C”.
C)
Create Log to history List action. Click on This message and Enter “Grade C”. Refer (A)
Once you complete this it will be like this.

Add two more conditions for Grade B and Grade A.
Perform (B) and (C) to achieve this.

Click on publish.

Click on workflows from Left navigation Bar and click on Employee Rating Workflow.
Click on Associate to Content Type and click on Employee Rating.

It will open the workflow in browser.

Check the “Start this workflow when a new item is created”. Click OK.
You can see Employee rating workflow has been created.

Now we will use content type we created in Shared documents library.
Select Lists and Libraries from Left Navigation Bar in SharePoint Designer and Select Shared documents.
Check the Allow management of Content Types under settings-- >advanced settings.
Then click on Add.


Select the Employee rating Content Type and click on set as default on the Ribbon.

Go to shared documents library and click on documents on the ribbon.
You can see the default document template is Employee rating.

Click on Add New document upload any document.
Select the content Type as Employee rating .
Rating as Grade A.

Click on Save.
Right click select workflows.

Click on Employee rating Workflow.

Click start button.


Click on Status Completed.
We select the Grade A, so the History description will come as Grade A.

So this way we can use the associate column data can be used.
If you select the Grade B or C , the History description will come as Grade B or C.
Let’s try…
Hope you find this useful.
Subscribe to:
Comments (Atom)