Showing posts with label Internet media type. Show all posts

Feb 3, 2012

Reusable Workflow with Associate columns in SharePoint 2010 using SharePoint Designer 2010

In This Article we will work with Reusable workflow using SharePoint designer 2010.
Scenario is based on different employee rating selection we will log the rating details into History list.We are going to use associate column in this workflow.

Create Site Column:

Open SharePoint designer 2010. Open the site. Select site columns.
Create site column Rating of Type Choice.
Select new group as Employee Review.

Enter three values Grade A, Grade B, Grade C. Select Display as Drop-down menu

click OK.

Click on OK and save the site column.

Create Content Type:

Content Type with the name Employee Rating.
Select Parent content Type as document content Type.
Select New group as Employee Review.

Click OK.
Click on the Employee rating Content Type.

Click on Edit Content Type Columns.

Search for Rating column, select the column and add it(Click OK).

Rating column added to the Employee Rating Content type.

Select the content types from the left navigation .and click on Employee Rating.
Click on Administration webpage, it will open the content type in browser.


Click on Advanced settings.
Browse and upload the Employee Review document.


Create Reusable workflow:

Open SharePoint Designer.
Click on Workflows in left navigation bar, click on Reusable workflow.


Enter Name and Description and Click OK.
Click on Association columns.

It will open the below pop up screen.

Click on Select site column; add the site column Rating you created before. Click OK.

In the Step1.
A)
Create Log to history List action. Click on This message and Enter “Least Rating”


B)
Add Condition “If Current item Field equals value”.

Select Field as “Rating” and Value to “Grade C”.

C)

Create Log to history List action. Click on This message and Enter “Grade C”. Refer (A)
Once you complete this it will be like this.

Add two more conditions for Grade B and Grade A.
Perform (B) and (C) to achieve this.

Click on publish.

Click on workflows from Left navigation Bar and click on Employee Rating Workflow.
Click on Associate to Content Type and click on Employee Rating.

It will open the workflow in browser.

Check the “Start this workflow when a new item is created”. Click OK.
You can see Employee rating workflow has been created.

Now we will use content type we created in Shared documents library.
Select Lists and Libraries from Left Navigation Bar in SharePoint Designer and Select Shared documents.
Check the Allow management of Content Types under settings-- >advanced settings.
Then click on Add.


Select the Employee rating Content Type and click on set as default on the Ribbon.

Go to shared documents library and click on documents on the ribbon.
You can see the default document template is Employee rating.

Click on Add New document upload any document.
Select the content Type as Employee rating .
Rating as Grade A.

Click on Save.
Right click select workflows.

Click on Employee rating Workflow.

Click start button.


Click on Status Completed.
We select the Grade A, so the History description will come as Grade A.

So this way we can use the associate column data can be used.
If you select the Grade B or C , the History description will come as Grade B or C.
Let’s try…

Hope you find this useful.

Jan 27, 2012

Contentype in Sharepoint 2010 using visual studio 2010 - Second Part


How to use the Content Type:


To use the content type developed in First part we will create a document library with the name of devendra.
Go to Site Actions-->View All site Content--> Create-->Select Library-->Select Document Library.


Enter a Name. Click on Create, a document library will get created. Select the Library which you create click on Library settings.


Click on Advanced settings.


Check Allow management of content type to Yes


In the below screen you can see the option Add from existing content types.


Select the content type which we created and Click on add.


To make the content type added to be default click on Change new button order and the default content type.


Only check the content type you developed or change the position to 1.here I am just checking the DevendraContentType.


Go to the document library; click on Add Document .see the Grade column with choice values.


The document has been added to library. To get Grade column to be displayed in the default view.


Go to library settings and click on All Documents under Views.


Check the Grade column.


Now you can see the Grade under default view.


you are done with associating content type developed using visual studio 2010 to document library.

SharePoint-Journey for Administrators, Developers and users

Contentype in Sharepoint 2010 using visual studio 2010 - First Part

Hello guys ...
Today we will work with content types in SharePoint 2010 using visual studio 2010.

First Part we will develop a content type using visual studio 2010.
In Second part how will use the developed content type .

shall we start now.........

here we go..

I will inherit from parent document content type and associate with the document library.

Create a project with the template type Content Type.

Give Project Name here it is with my name DevendraContenType 


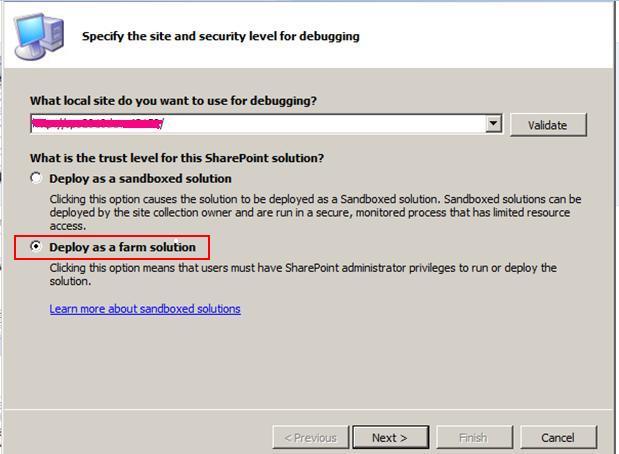
Deploy as Form solution.


Click on Next.
Select the content type which you need to Inherit from.
Here I am selecting as Document content type.


Click Finish.It will show the below project structure.


I want to add the field called Grade to the content type.
This is of choice type. and choice values are GradeA,GradeB,Grade C and Grade D.

I need to generate a schema for the field like below.


  Grade A+
  
    Grade A+
    Grade A
    Grade B+
    Grade B
    Grade C


one of easy way to achieve this is.....

To create field schema I am using list called Devendra. Go to list setting page.Click on create column.


Create column called Grade. This is of choice type. Enter few values.
GradeA
GradeB
Grade C
Grade D


Open SharePoint Manager 2010. And open the site then under List section got to fields section .Check for the Grade field


Click on Schema Xml. And copy the content


Open elements.xml file from the solution which is under ContentType1.Add the Fieldref tag also. Change the Name and Group properties under Countertype tag section to required values.


Click on the feature1 to change the Title and description.
Right click on the project and deploy the solution.


You can observe what are steps happening in the output window.


After deployment we need to check the content type deployed properly or not.
Click on Site Actions-> site settings
Under Site Collection Administration: Click on Site collection Features


See the below site collection feature is already activated


Click on Site Actions-> site settings

Under Galleries: Click on Site Content Types


we are done with it.You can see the Group name and the content type.


Congratulations... you have developed a content type in sharePoint 2010 using Visual studio 2010.
we will see in second part how to use the content type which you developed just now.

SharePoint-Journey for Administrators, Developers and users