Showing posts with label Microsoft. Show all posts

Feb 7, 2012

Seqential workflow in SharePoint 2010 using Visual studio 2010

Hello guys,

In this article we will work on developing sequential workflow in SharePoint 2010 using Visual studio 2010.
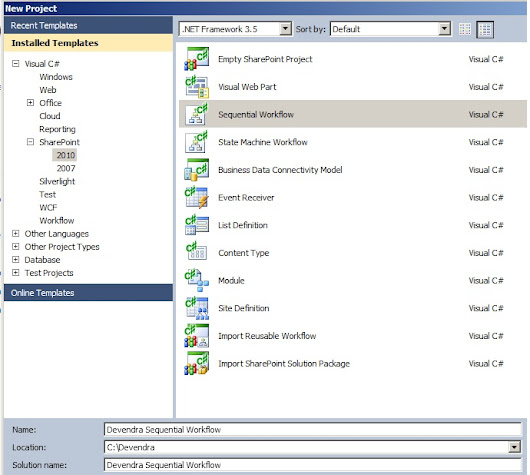
let start creating new project of type Sequential Workflow ,under SharePoint 2010 in Visual studio 2010.

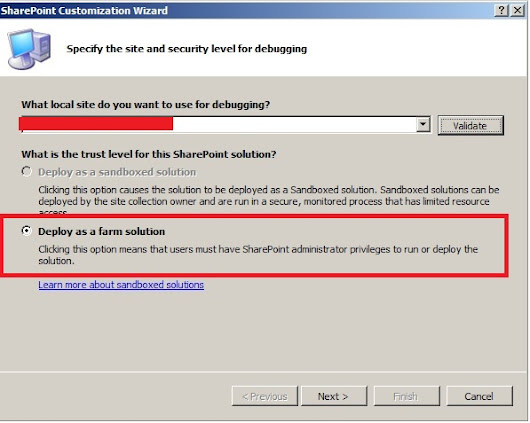
Deploy as form Solution. Click Next
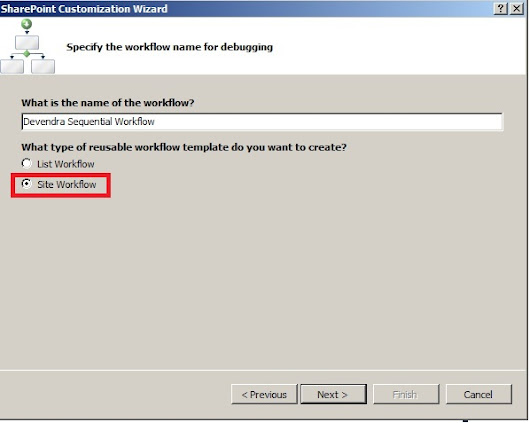
Name workflow as devendra Sequential workflow and select site workflow.
click on Next
CLick Next.
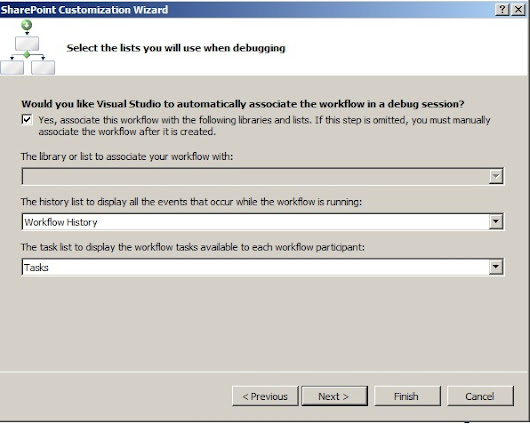
CLick Next.
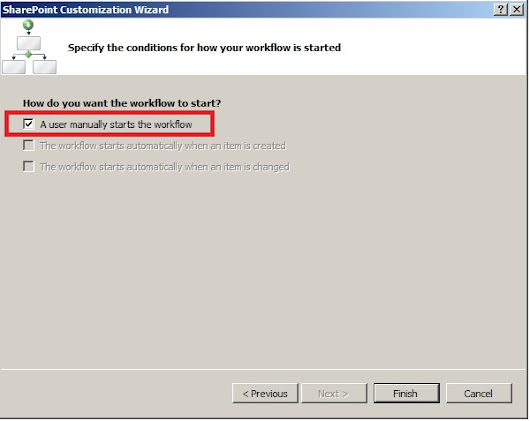

Click on Finish.
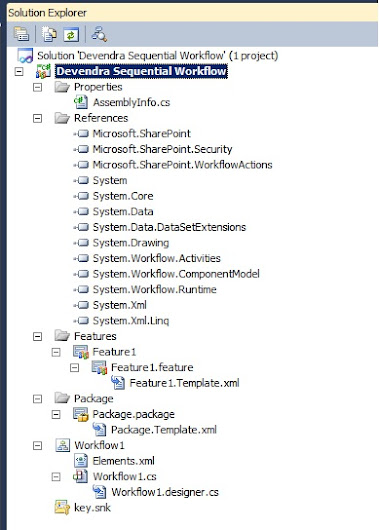
It will show the below project structure.
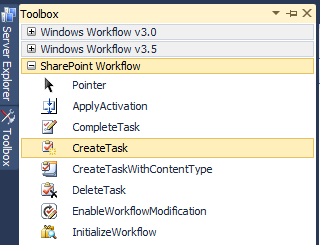
Go to tool box. Select Create Task under SharePoint workflow
Drag and drop below onworkflowActivated .
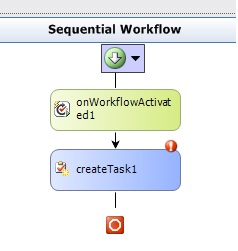
Click on the redmark in Createtask1 control
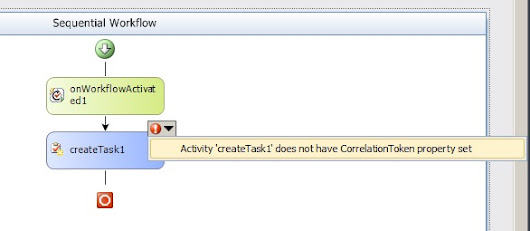
Click on Activity ‘createTask1’ does not have Correlation property set.
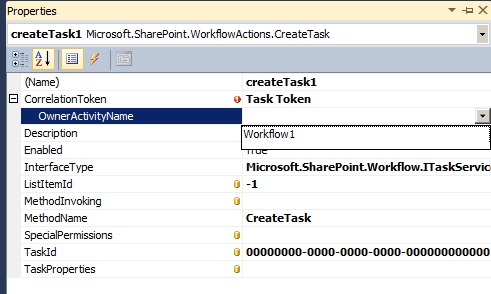
Give the Correlation token as Task token.
Select Owner ActivityName as Workflow1.
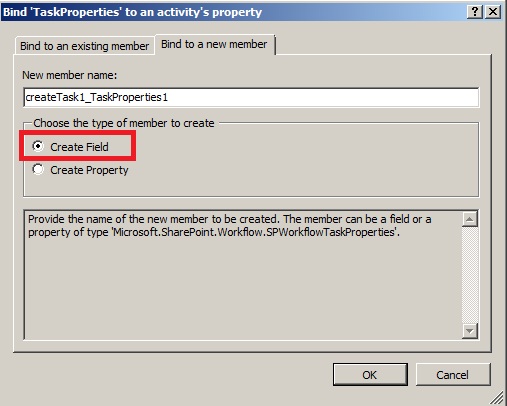
Click on TaskProperties.Select Bind to new member.
Select create Field. Click OK.
Go to workflow.cs[design] --> right click --> View Code
It will redirect to the code file workflow.cs file you can see the filed you have added just now.
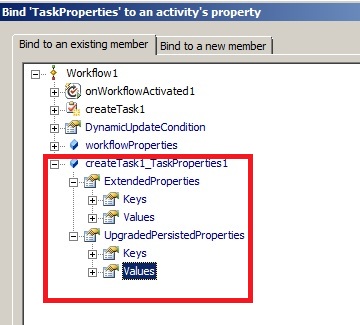
If you check the Bind to existing member you can the Field added it.

Click on TaskID from the properties of CreateTask activity. Select Bind to new member.
Select create Field. Click Ok.
Go to workflow.cs[desgin]-->right click -->View Code
It will redirect to the code file workflow.cs file you can see the filed you have added just now.

Go to Workflow1.cs-Desgin.
Double click on Create Task Activity.It will generate a method called createTask1_MethodInvoking.
Write the below code in the method.

       private void createTask1_MethodInvoking(object sender, EventArgs e)
  {
      createTask1_TaskId1 = Guid.NewGuid();

      createTask1_TaskProperties1.Title = "New Task";
      createTask1_TaskProperties1.Description = "Please complete this ASAP";
      createTask1_TaskProperties1.AssignedTo = workflowProperties.Originator;

  }

The above code create the task for user we runs the workflow.
Go to ToolBox select LogtoHistoryListActivity under Sharepoint workflow
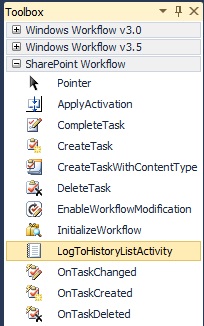
Drag and drop the LogtoHistoryListActivity to workflow.cs[design] file below create task
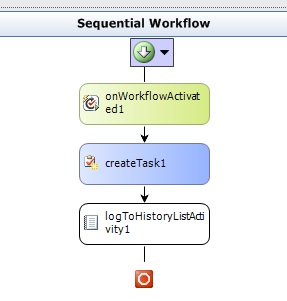
Click on logToHistoryActivity1 Press F4 to see the properties.
Click on History Description.

Click OK.
Check the properties logToHistoryActivity1

Right click on logToHistoryActivity1.
Click on Generate Handlers.

A method will get generate with the name logToHistoryListActivity1_MethodInvoking
Paste the below code inside the method.
private void logToHistoryListActivity1_MethodInvoking(object sender, EventArgs e)
  {
  logToHistoryListActivity1_HistoryDescription1 = "Work Flow is Running on " + workflowProperties.Web.Url;
  }

Select the project. Right click and Deploy.

Go to Site Actions->View AllsiteContent.

Select Site Workflows.

Click on Devendra Seqential workflow.


Click on status completed.
You can see the web site URL under Description.

You can check the task also has been created in task list for the user who has run the workflow.

Hope you find this useful.

SharePoint-Journey for Administrators, Developers and users

Feb 3, 2012

Globally Reusable workFlows in Sharepoint 2010

In this article we will discuss about Globally Reusable workflows in SharePoint 2010.

there is new workflow in SharePoint 2010 i.e. Reusable workflow .This workflow will be developed based on content type which you select (All content Type),so it can be used in any list or library in a particular site.

If you want to use the Reusable workflow globally i.e. in all sites under one site collection you need work Globally reusable workflows.

open SharePoint designer 2010 ,open the site from designer ,click on workflows,
here i already created one reusable workflow i.e. Employee Rating:


Click on that workflow and see the settings ,the visibility of this workflow is only to this site.


to make this one as globally reusable , from the ribbon control select Publish globally option.


system will gives the below confirmation message.


Click on Ok.

Now see the Employee rating is under Globally reusable Workflow section.


Click on the Employee rating Globally reusable workflow , check the visibility , now it is changed from This Site Only to Global(All Subsites).


Now you can use this workflow in all Subsites under your site collection.
Hope you found this useful.

SharePoint-Journey for Administrators, Developers and users

Site WorkFlow in Sharepoint 2010 using Visual studio 2010

In This article we will discuss about site workflows.
Site work flow is not to a specific list or library you can run on any one of those.
In this example we will create a new Custom List Called Product List and take the data of existing Product List to the new Product list as a backup.
Prerequisite: Make sure that your site is having Product List.

Open visual studio.
Open File-- > New-- > project.
From SharePoint -- > 2010 -- > Select Sequential Workflow.
Give name as Site workflow.


Deploy as form solution.


Click Next.
Select Site workflow.
Give the workflow name which you like.


Click Next.


Click Next.
Here you can see only manually started option available.


Click Finish. It will show the below project structure.


If you want to change the URL of site to deploy, go to properties of the project (F4). Change the Site URL property.


Create Class1 from toolbox and drag and drop below onworkflowactivated.
Open the class1.cs file and paste the below code.

using System;
using System.Collections.Generic;
using System.Linq;
using System.Text;
using Microsoft.SharePoint;

namespace Product Backup
{
  public class Class1 : System.Workflow.ComponentModel.Activity
  {
      public Class1()
      { }

protected override System.Workflow.ComponentModel.ActivityExecutionStatus Execute(System.Workflow.ComponentModel.ActivityExecutionContext executionContext)
      {
          try
          {
              SPSite site = SPContext.Current.Site;
              SPWeb web = site.OpenWeb();
              SPList aList = web.GetList("/Lists/ Product s");
              try
              {
                  SPList bList = web.GetList("/Lists/ ProductsBackup");
                  bList.Delete();
              }
              catch
              { }
              Guid newAnnID = web.Lists.Add("ProductsBackup", "A backup Product s list.", SPListTemplateType.GenericList);
              SPList bakList = web.Lists[newAnnID];
            foreach (SPListItem item in aList.Items)
              {
                  SPListItem newAnnItem = bakList.Items.Add();
                  foreach (SPField field in aList.Fields)
                  {
                      if (!field.ReadOnlyField)
                          newAnnItem[field.Id] = item[field.Id];
                  }
                  newAnnItem.Update();
              }
              bakList.OnQuickLaunch = true;
              bakList.Update();
          }
          catch (Exception errx)
          {
            }
          return base.Execute(executionContext);
      }
  }
}

Build and deploy the solution.
Observe the output window.


Open the site URL and check, you will have a ProductsBackup list created with the Products List data.

Hope you found this useful.

SharePoint-Journey for Administrators, Developers and users

Feb 2, 2012

Develope Content Type from Custom parent Conten Type in Sharepoint 2010 using Visual Studio 2010.

hello guys ,

This is our third Article on the Content Types in SharePoint 2010. the FirstPart we developed a content type using Visual studio 2010 we will use that content type as a base and start from there.

we will open the Content Type project created in FirstPart.


Right click on solution -->Add -->new project.


Select the Project Type as Content Type under SharePoint 2010.


Click OK.
deploy solution as Form Solution.


Click Next.
Select the Content type which we created in the FirstPart i.e. DevendraContentType

Click Finish.


Open Elements.xml
we can see that the contentType Inherited from the Previous one. See the below pic for the details.


and add the Fields which you want and FiledRef in the Elements.xml .to do this you can follow the FirstPart

to use the content type you can use the SecondPart

Hope you Enjoyed....

SharePoint-Journey for Administrators, Developers and users

Jan 30, 2012

Creating List Programatically in SharePoint 2010 using Visual Studio 2010

Today we will discuss about creating List programmatically in SharePoint 2010 using Visual studio 2010.
If we are using only one instance of list we will follow this approach for creating list.
open the visual studio 2010.
File-->New-->Project
Select C#-->SharePoint-->2010
Select Empty SharePoint Project


Deploy as a Form solution.
Click on Finish


Project Solution structure is below for Empty SharePoint Project.


Select the project and click on F4 for the properties.
Check for the Sandbox Solution property it is set to false now as we select the Trust level for SharePoint solution as From Solution.
From here if you change that to Sandbox solution by setting property
Sandbox Solution=”True”
You can edit the site URL which you want to deploy using site URL property.


Right Click on Feature node and click on AddFeature.


It will add Feature1 to the Features node in the project.
Change the Title according to your requirement .Here it is Devendra Employee List feature.
I want this List available at site collection level to achieve this we need to change the
Scope From Web to Site.


Now I am using Scope as web level only.


We will create a list using object model because we are going to use only one instance of this list so there is no point of creating list definition.
To do that I will add a feature receiver.
Add Event Receiver to the Feature1 node in the project.


Go ahead and add . Then uncomment the FeatureActivated event .
We will write a code here which will add the Employee List whenever we activated this feature.

using System;
using System.Runtime.InteropServices;
using System.Security.Permissions;
using Microsoft.SharePoint;
using Microsoft.SharePoint.Security;

namespace Devendra_Feature_Event_Receivers.Features.AddList
{
 /// 
 /// This class handles events raised during feature activation, deactivation, installation, uninstallation, and upgrade.
 /// 
 /// 
 /// The GUID attached to this class may be used during packaging and should not be modified.
 /// 

 [Guid("5bf5f6c5-c371-419a-984b-f0ecf9ddeda0")]
 public class Feature1EventReceiver : SPFeatureReceiver
 {
     // Uncomment the method below to handle the event raised after a feature has been activated.
     public override void FeatureActivated(SPFeatureReceiverProperties properties)
     {
         try
         {
             //get the current web object.
             SPWeb web = properties.Feature.Parent as SPWeb;

          
             SPList list = web.EnsureList("Employee", "This list contains Employee details.", SPListTemplateType.GenericList);

         
             if (list != null)
             {
              
                 SPField field = list.EnsureField("Title", "", SPFieldType.Text, true);
                 field.Title = "FirstName";
                 field.Update();

              
                 SPField fld = null;
             
                 fld = list.EnsureField("LastName", "Employee LastName", SPFieldType.Text, true);

              
                 if (fld != null)
                 {
                     SPView view = list.Views[0];
                     view.ViewFields.Add(fld);
                     view.Update();
                     fld = null;
                 }
              
                 SPListItemCollection listItems = list.Items;
                 AddItems(listItems, "Devendra", "Velegandla");
             }
             else
             {

             }
         }
         catch (Exception ex)
         {
             throw ex;
         }
     }
     public static void AddItems(SPListItemCollection listItems, string FirstName, string LastName)
     {
         SPListItem item = null;
         item = listItems.Add();
         item["FirstName"] = FirstName;
         item["LastName"] = LastName;
         item.Update();
     }

     public override void FeatureDeactivating(SPFeatureReceiverProperties properties)
     {
     
         SPWeb web = properties.Feature.Parent as SPWeb;
   
         web.DeleteList("Employee");
     }


 }

}


add one more class called utilities.cs of type static.


using System;
using System.Collections.Generic;
using System.Linq;
using System.Text;
using Microsoft.SharePoint;
namespace Devendra_Feature_Event_Receivers.Features.AddList
{
 public static class Utilities
 {

     public static SPList EnsureList(this SPWeb web, string listTitle, string desc, SPListTemplateType lstTemplateType)
     {
     
         SPListCollection lstCollection = web.Lists;

    
         SPList lstObj = (from SPList lst in lstCollection
                          where string.Equals(lst.Title, listTitle, StringComparison.InvariantCultureIgnoreCase) == true
                          select lst).FirstOrDefault();

     
         if (lstObj != null)
         {
             return lstObj;
         }
     
         Guid lstGuid = web.Lists.Add(listTitle, desc, lstTemplateType);
         try
         {
             SPList newList = web.Lists.GetList(lstGuid, true);
             newList.OnQuickLaunch = true;
             newList.Update();
             return newList;
         }
         catch
         {
             return null;
         }
     }
 
     public static SPField EnsureField(this SPList list, string fldDisplayName, string fldDesc, SPFieldType fldType, bool isMadatory)
     {
     
         SPFieldCollection fieldCollection = list.Fields;

     
         SPField spField = (from SPField field in fieldCollection
                            where string.Equals(field.Title, fldDisplayName, StringComparison.InvariantCultureIgnoreCase) == true
                            select field).FirstOrDefault();

     
         if (spField != null)
         {
             return spField;
         }
      
         try
         {
             list.Fields.Add(fldDisplayName, fldType, isMadatory);
             SPField spfield = list.Fields.GetField(fldDisplayName);
             spfield.Description = fldDesc;
             spfield.Update();
             return spfield;
         }
         catch
         {
             return null;
         }
     }
 
     public static bool DeleteList(this SPWeb web, string listTitle)
     {
      
         SPListCollection lstCollection = web.Lists;

      
         SPList lstObj = (from SPList lst in lstCollection
                          where
                              string.Equals(lst.Title, listTitle, StringComparison.InvariantCultureIgnoreCase) == true
                          select lst).FirstOrDefault();

      
         if (lstObj != null)
         {
             try
             {
                 lstObj.Delete();
                 return true;
             }
             catch (Exception ex)
             {
             }
         }
         return false;
     }
 }
}


Add Item to the list data to the Employee List.
Once we deactivate this feature the list will get deleted.
Add one more class call utilities.


Once you click on the package .go to Bin folder of the project get the WSP file.


Add the solution using stsadm command.
Click on run: type CMD
Execute below command
Stsadm –o addsolution –filename c:\Devendra_Feature_Event_Receiver.wsp.

Open Central Admin to deploy the solution.
Got o system settings -> Manage Form solutions


Deploy the solution.
You can see the below screen solution deployed globally.


Open the site URL which we deployed the solution.
Click on SiteActions-->Site settings
Under Site Actions click on Manage Site Features.


Activate the feature Devendra Employee List Feature.


After activation we can see the Employee list and data inserted into the list.


Once you deactivate the feature list will get deleted.

SharePoint-Journey for Administrators, Developers and users